不依赖外部库,用Rust实现一个简单的编程语言,代码如下。
1 | use std::collections::HashMap; |
不依赖外部库,用Rust实现一个简单的编程语言,代码如下。
1 | use std::collections::HashMap; |
在Rust中,可以使用自定义section的方式,将一些数据(比如函数信息)保存到二进制文件中,可以实现类似反射的能力,代码如下。
1 | type ELEMENT = (&'static str, fn(i32, i32) -> i32); |
使用标准库实现一个简单的TCP服务器,编译后之后495k,代码如下。
1 | use std::io::{Read, Write}; |
测试一下,结果如下:1
2冷启动速度:2.3ms
内存占用:1.6MB
使用Tokio实现一个简单的TCP服务器,代码如下。
首先添加依赖:1
2[dependencies]
tokio = { version = "1.49", features = ["rt", "macros", "net", "io-util"] }
创建文件src/main.rs:1
2
3
4
5
6
7
8
9
10
11
12
13
14
15
16use tokio::io::{AsyncReadExt, AsyncWriteExt};
use tokio::net::TcpListener;
async fn main() -> std::io::Result<()> {
let listener = TcpListener::bind("127.0.0.1:3000").await?;
loop {
let (mut socket, _) = listener.accept().await?;
tokio::spawn(async move {
let mut buf = [0; 1024];
if socket.read(&mut buf).await.is_ok() {
let _ = socket.write_all(b"Hello world!").await;
}
});
}
}
测试一下,结果如下:1
2冷启动速度:2.4ms
内存占用:1.9MB
Actix-web是一个Rust中的高性能的Web服务器,采用Actor模型,性能极高,功能完善,适合生成环境,代码如下。
首先添加依赖:1
2[dependencies]
actix-web = "4.12.1"
创建文件src/main.rs:1
2
3
4
5
6
7
8
9
10
11
12
13
14
15use actix_web::{get, App, HttpResponse, HttpServer, Responder};
async fn hello() -> impl Responder {
HttpResponse::Ok().body("Hello world!")
}
async fn main() -> std::io::Result<()> {
HttpServer::new(|| App::new().service(hello))
.bind(("127.0.0.1", 3000))?
.workers(1)
.run()
.await
}
测试一下,结果如下:1
2冷启动速度:3.6ms
内存占用:4MB
Axum是一个轻量级的Web服务器,基于Tokio,性能高,内存占用小,适合于生产环境,特别是Serverless环境,代码如下。
首先添加依赖:1
2
3[dependencies]
axum = "0.8.8"
tokio = { version = "1.49.0" }
创建文件src/main.rs:1
2
3
4
5
6
7
8
9
10
11use axum::{routing::get, Router};
async fn main() {
// build our application with a single route
let app = Router::new().route("/", get(|| async { "Hello, World!" }));
// run our app with hyper, listening globally on port 3000
let listener = tokio::net::TcpListener::bind("0.0.0.0:3000").await.unwrap();
axum::serve(listener, app).await.unwrap();
}
测试一下,结果如下:1
2冷启动速度:2.5ms
内存占用:2MB
在Rust中,可以使用
clap库实现命令行参数解析,使用起来非常简单。
添加项目依赖:1
2[dependencies]
clap = { version = "4", features = ["derive"] }
代码如下:1
2
3
4
5
6
7
8
9
10
11
12
13
14
15
16
17
18
19
20
21
22use clap::Parser;
/// Simple program for demo
struct Args {
/// Name of the person to greet
name: String,
/// Number of times to greet
count: u8,
}
fn main() {
let args = Args::parse();
for _ in 0..args.count {
println!("Hello {}!", args.name);
}
}
输入命令cargo run -- -n killf进行测试,结果如下:1
Hello killf!
在一些复杂的项目中,难免会出现循环引用的问题,这里记录一下如何使用
dumpster处理引用。
首先添加依赖:1
2[dependencies]
dumpster = "2"
dumpster的基本使用如下:1
2
3
4
5
6
7
8
9
10
11
12
13
14use dumpster::unsync::Gc;
use std::cell::Cell;
fn main() {
let x = Gc::new(Cell::new(100));
println!("x={} {:?}", x.get(), x);
let y = x.clone();
println!("y={} {:?}", y.get(), y);
x.set(123);
println!("x={} {:?}", x.get(), x);
println!("y={} {:?}", y.get(), y);
}
测试一下,可以看到内存地址没有发生变化:1
2
3
4x=100 Gc { ptr: Cell { value: Nullable(0x62ade4ac4d90) } }
y=100 Gc { ptr: Cell { value: Nullable(0x62ade4ac4d90) } }
x=123 Gc { ptr: Cell { value: Nullable(0x62ade4ac4d90) } }
y=123 Gc { ptr: Cell { value: Nullable(0x62ade4ac4d90) } }
对于结构体的循环引用,可以使用dumpster处理,代码如下:1
2
3
4
5
6
7
8
9
10
11
12
13
14
15
16
17
18
19
20
21
22
23
24
25
26
27
28use dumpster::unsync::Gc;
use dumpster::Trace;
use std::cell::RefCell;
struct Foo {
value: i32,
ptr: Option<Gc<RefCell<Foo>>>,
}
impl Drop for Foo {
fn drop(&mut self) {
println!("Dropping Foo");
}
}
fn main() {
let foo = Gc::new(RefCell::new(Foo {
value: 123,
ptr: None,
}));
foo.borrow_mut().ptr = Some(foo.clone());
println!("foo = {:?}", foo);
let foo = 3;
println!("foo = {:?}", foo);
}
测试一下,可以看到对象被销毁了:1
2
3foo = Gc { ptr: Cell { value: Nullable(0x5b379afeeae0) } }
foo = 3
Dropping Foo
在Rust中如果函数需要消耗所有权,则将参数定义为带所有权的类型,如果不需要消耗所有权,则定义成引用,如果只有在某些情况下才需要所有权,则可以定义为
Cow,即写时复制。当调用者无法提供所有权对象时,可以传入引用,仅在需要的时候才会拷贝内存,代码如下。
1 | use std::borrow::Cow; |
测试一下,结果如下:1
2Borrowed: a
Owned: ab
在Rust中将结构体的字段设为引用,那么反序列化的时候会尽可能避免拷贝内存,代码如下。
1 | use serde::Deserialize; |
测试一下,结果如下:1
2
3Result { msg: "Hello,world!" }
Pointer { addr: 0x60b10e0e781e, metadata: 34 }
Pointer { addr: 0x60b10e0e7832, metadata: 12 }
在actix-web中需要手动反序列化,代码如下。
1 | use actix_web::{web, App, HttpResponse, HttpServer, Responder}; |
本次实验是使用Rust编译一个时间日期的MCP服务。
项目依赖:1
2
3
4
5tokio = { version = "1.49", features = ["rt", "rt-multi-thread", "macros"] }
rmcp = { version = "0.13", features = ["server", "schemars", "transport-streamable-http-server", "transport-streamable-http-server-session", "transport-worker"] }
axum = "0.8.8"
chrono = "0.4"
serde_json = "1"
编写main.rs文件:1
2
3
4
5
6
7
8
9
10
11
12
13
14
15
16
17
18
19
20
21
22
23
24
25
26
27
28
29
30
31
32
33
34
35
36
37
38
39
40
41
42
43
44
45
46
47
48
49use chrono::Utc;
use rmcp::handler::server::{tool::ToolRouter, ServerHandler};
use rmcp::transport::streamable_http_server::session::local::LocalSessionManager;
use rmcp::transport::streamable_http_server::{StreamableHttpServerConfig, StreamableHttpService};
use rmcp::{tool, tool_handler, tool_router};
use std::sync::Arc;
struct TimeService {
tool_router: ToolRouter<Self>,
}
impl TimeService {
fn new() -> Self {
Self {
tool_router: Self::tool_router(),
}
}
async fn get_time(&self) -> Result<String, rmcp::ErrorData> {
let now = Utc::now();
let beijing_offset = chrono::FixedOffset::east_opt(8 * 3600).unwrap();
let beijing_time = now.with_timezone(&beijing_offset);
Ok(beijing_time.to_rfc3339())
}
}
impl ServerHandler for TimeService {}
async fn main() -> Result<(), Box<dyn std::error::Error>> {
let service = StreamableHttpService::new(
|| Ok(Arc::new(TimeService::new())),
LocalSessionManager::default().into(),
StreamableHttpServerConfig::default(),
);
let addr = std::env::var("HOST").unwrap_or("0.0.0.0:1234".to_string());
let router = axum::Router::new().nest_service("/mcp", service);
let tcp_listener = tokio::net::TcpListener::bind(addr).await?;
let _ = axum::serve(tcp_listener, router).await;
Ok(())
}
然后,将http://127.0.0.1:1234/mcp配置到支持MCP的AI工具中即可测试。
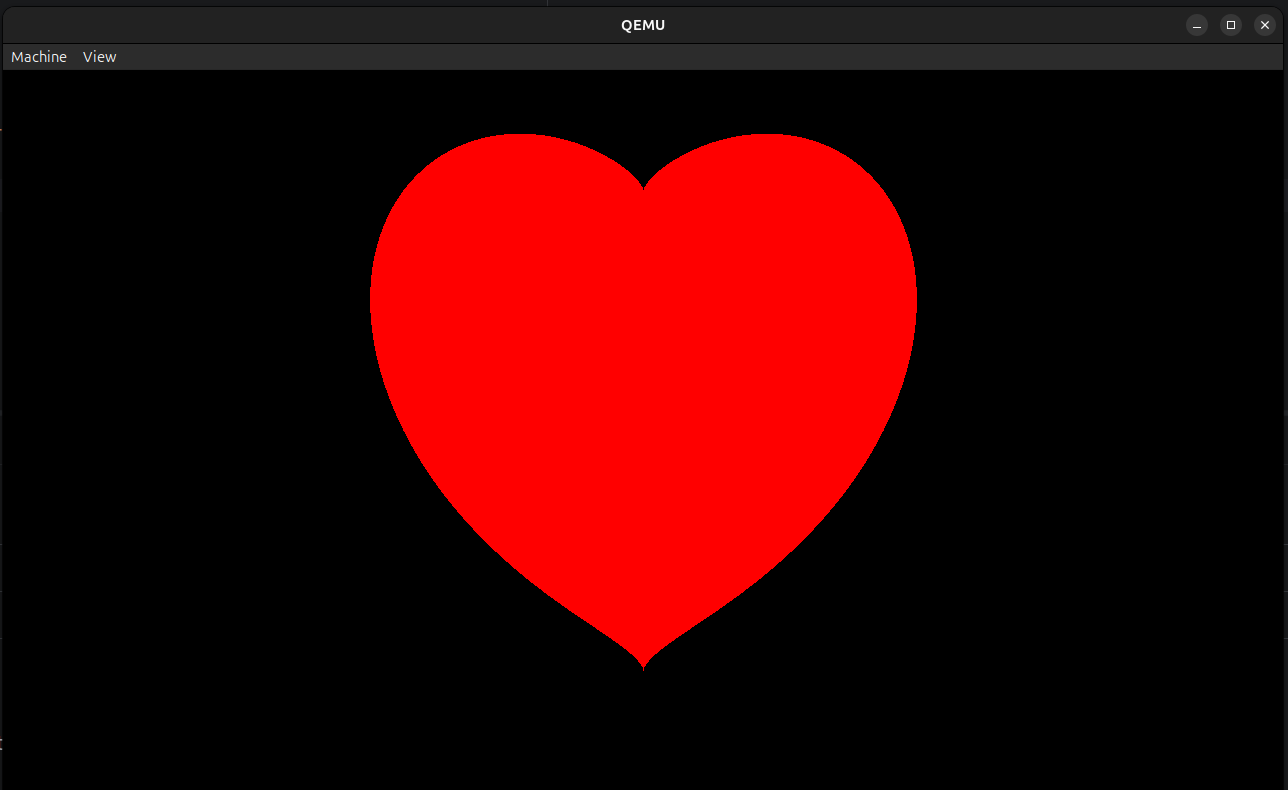
Rust支持系统编程,可以编写内核程序,本次实验是使用Rust编写内核程序,在裸机上运行并打印一个爱心。
项目结构:1
2
3
4
5
6
7
8
9
10
11.
├── build.rs
├── Cargo.lock
├── Cargo.toml
├── kernel
│ ├── Cargo.toml
│ └── src
│ └── main.rs
├── rust-toolchain.toml
├── src
│ └── main.rs
build.rs是一个构建脚本,用于生成镜像文件,代码如下。1
2
3
4
5
6
7
8
9
10
11
12
13
14
15
16
17
18
19
20
21
22
23
24
25use std::path::PathBuf;
fn main() {
// set by cargo, build scripts should use this directory for output files
let out_dir = PathBuf::from(std::env::var_os("OUT_DIR").unwrap());
// set by cargo's artifact dependency feature, see
// https://doc.rust-lang.org/nightly/cargo/reference/unstable.html#artifact-dependencies
let kernel = PathBuf::from(std::env::var_os("CARGO_BIN_FILE_KERNEL_kernel").unwrap());
// create an UEFI disk image (optional)
let uefi_path = out_dir.join("uefi.img");
bootloader::UefiBoot::new(&kernel)
.create_disk_image(&uefi_path)
.unwrap();
// create a BIOS disk image
let bios_path = out_dir.join("bios.img");
bootloader::BiosBoot::new(&kernel)
.create_disk_image(&bios_path)
.unwrap();
// pass the disk image paths as env variables to the
println!("cargo:rustc-env=UEFI_PATH={}", uefi_path.display());
println!("cargo:rustc-env=BIOS_PATH={}", bios_path.display());
}
Cargo.toml文件如下:1
2
3
4
5
6
7
8
9
10
11
12
13
14
15[workspace]
resolver = "3"
members = ["kernel"]
[package]
name = "test_bootloader"
version = "0.1.0"
edition = "2024"
[dependencies]
ovmf-prebuilt = "0.2.5"
[build-dependencies]
kernel = { path = "kernel", artifact = "bin", target = "x86_64-unknown-none" }
bootloader = "0.11.13"
在rust-toolchain.toml中配置编译器的版本,如下:1
2
3[toolchain]
channel = "nightly"
targets = ["x86_64-unknown-none"]
src\main.rs是一个测试程序,用于启动qemu虚拟机,所以你可能需要安装qemu。1
2
3
4
5
6
7
8
9
10
11
12
13
14
15
16
17
18
19
20
21
22
23
24
25
26
27
28
29
30
31
32
33
34
35
36
37
38
39
40
41
42
43
44
45
46
47
48
49
50
51
52
53
54
55
56
57
58
59
60
61
62
63
64
65
66
67
68
69use ovmf_prebuilt::{Arch, FileType, Prebuilt, Source};
use std::env;
use std::process::{Command, exit};
fn main() {
// read env variables that were set in build script
let uefi_path = env!("UEFI_PATH");
let bios_path = env!("BIOS_PATH");
// parse mode from CLI
let args: Vec<String> = env::args().collect();
let prog = &args[0];
// choose whether to start the UEFI or BIOS image
let uefi = match args.get(1).map(|s| s.to_lowercase()) {
Some(ref s) if s == "uefi" => true,
Some(ref s) if s == "bios" => false,
Some(ref s) if s == "-h" || s == "--help" => {
println!("Usage: {prog} [uefi|bios]");
println!(" uefi - boot using OVMF (UEFI)");
println!(" bios - boot using legacy BIOS");
exit(0);
}
_ => {
eprintln!("Usage: {prog} [uefi|bios]");
exit(1);
}
};
let mut cmd = Command::new("qemu-system-x86_64");
// print serial output to the shell
cmd.arg("-serial").arg("mon:stdio");
// don't display video output
cmd.arg("-display").arg("gtk");
// enable the guest to exit qemu
cmd.arg("-device")
.arg("isa-debug-exit,iobase=0xf4,iosize=0x04");
if uefi {
let prebuilt =
Prebuilt::fetch(Source::LATEST, "target/ovmf").expect("failed to update prebuilt");
let code = prebuilt.get_file(Arch::X64, FileType::Code);
let vars = prebuilt.get_file(Arch::X64, FileType::Vars);
cmd.arg("-drive")
.arg(format!("format=raw,file={uefi_path}"));
cmd.arg("-drive").arg(format!(
"if=pflash,format=raw,unit=0,file={},readonly=on",
code.display()
));
// copy vars and enable rw instead of snapshot if you want to store data (e.g. enroll secure boot keys)
cmd.arg("-drive").arg(format!(
"if=pflash,format=raw,unit=1,file={},snapshot=on",
vars.display()
));
} else {
cmd.arg("-drive")
.arg(format!("format=raw,file={bios_path}"));
}
let mut child = cmd.spawn().expect("failed to start qemu-system-x86_64");
let status = child.wait().expect("failed to wait on qemu");
match status.code().unwrap_or(1) {
0x10 => 0, // success
0x11 => 1, // failure
_ => 2, // unknown fault
};
}
kernel\Cargo.toml文件如下:1
2
3
4
5
6
7
8
9[package]
name = "kernel"
version = "0.1.0"
edition = "2024"
[dependencies]
bootloader_api = "0.11.13"
uart_16550 = "0.4.0"
x86_64 = "0.15.4"
kernel\src\main.rs文件是内核程序,当加载引导程序后,会调用kernel_main函数,我们在kernel_main函数中向屏幕中画一个爱心的图像:1
2
3
4
5
6
7
8
9
10
11
12
13
14
15
16
17
18
19
20
21
22
23
24
25
26
27
28
29
30
31
32
33
34
35
36
37
38
39
40
41
42
43
44
45
46
47
48
49
50
51
52
53
54
55
56
57
58
59
60
61
62
63
64
65
66
67
68
69
70
71
72
73
74
75
76
77
78
79
80
81
use bootloader_api::{BootInfo, entry_point};
use bootloader_api::info::{FrameBuffer, FrameBufferInfo};
use core::fmt::Write;
pub enum QemuExitCode {
Success = 0x10,
Failed = 0x11,
}
pub fn exit_qemu(exit_code: QemuExitCode) -> ! {
use x86_64::instructions::{nop, port::Port};
unsafe {
let mut port = Port::new(0xf4);
port.write(exit_code as u32);
}
loop {
nop();
}
}
pub fn serial(port: u16) -> uart_16550::SerialPort {
let mut port = unsafe { uart_16550::SerialPort::new(port) };
port.init();
port
}
entry_point!(kernel_main);
fn kernel_main(boot_info: &'static mut BootInfo) -> ! {
let mut port = serial(0x3F8);
writeln!(port, "\n=(^.^)= Hello,world!\n").unwrap();
let framebuffer = boot_info.framebuffer.as_mut().unwrap();
draw_heart(framebuffer);
loop {}
}
fn draw_heart(fb: &mut FrameBuffer) {
let info = fb.info();
let cx = info.width as f32 / 2.0;
let cy = info.height as f32 / 2.0;
let size = core::cmp::min(info.width, info.height) as f32 / 3.0;
fb.buffer_mut().fill(0);
for py in 0..info.height {
for px in 0..info.width {
let x = (px as f32 - cx) / size;
let y = (cy - py as f32) / size;
let eq = (x * x + y * y - 1.0) * (x * x + y * y - 1.0) * (x * x + y * y - 1.0) - x * x * y * y * y;
if eq <= 0.0 {
unsafe { put_pixel(fb, info, px, py, 255, 0, 0) };
}
}
}
}
unsafe fn put_pixel(fb: &mut FrameBuffer, info: FrameBufferInfo, x: usize, y: usize, r: u8, g: u8, b: u8) {
let offset = (y * info.stride + x) * info.bytes_per_pixel;
fb.buffer_mut()[offset] = b;
fb.buffer_mut()[offset + 1] = g;
fb.buffer_mut()[offset + 2] = r;
}
fn panic(info: &core::panic::PanicInfo) -> ! {
let _ = writeln!(serial(0x3F8), "PANIC: {info}");
exit_qemu(QemuExitCode::Failed);
}
使用cargo run bios启动测试程序,顺利的话你可以在qemu虚拟机中看到一个爱心。
缺失模块。
1、请确保node版本大于6.2
2、在博客根目录(注意不是yilia-plus根目录)执行以下命令:
npm i hexo-generator-json-content --save
3、在根目录_config.yml里添加配置:
  jsonContent:
    meta: false
    pages: false
    posts:
      title: true
      date: true
      path: true
      text: false
      raw: false
      content: false
      slug: false
      updated: false
      comments: false
      link: false
      permalink: false
      excerpt: false
      categories: false
      tags: true